Retail Agent Access Main Menu
The retail agent access main menu controls the primary features that agents can access through the retail agent access portal.
To Set Up Main Menu Features
- On the Utility menu, click SETUP.
- In the Setup Console, click Retail Agent Access. Brief reference material is displayed.
- In the Setup Console, click Configuration > Main Menu. The retail agent access Attachments screen is displayed.
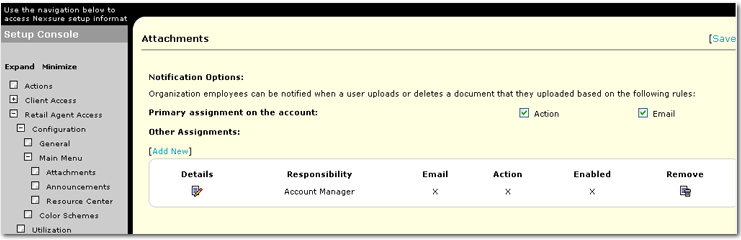
- In the Setup Console, click Attachments. The following options are available on the
 Attachments screen:
On the Attachments screen, selections are available to determine to whom and what type of notification is sent regarding client activity on the Attachments screen. Nexsure will create a notification if any of the following are true:
- Agent uploads an attachment.
- Agent deletes an attachment.
- Primary assignment on the account: Select Action and / or Email to designate the method by which attachment activity is communicated to the primary assignment on the account.
Note: A notification will always be sent to a staff member. Once a role is selected for notification, if there is no staff member assigned to that role a notification will go to the primary assignment even if no notifications were selected for that role. For example, an account manager is set up to receive notification but there is no account manager for the agency. In this case, a notification will be sent to the primary assignment even though no notification was set up for them.
- Other Assignments: Click [Add New] to add other staff members to which notifications can be sent. The Add Recipient dialog box is displayed.
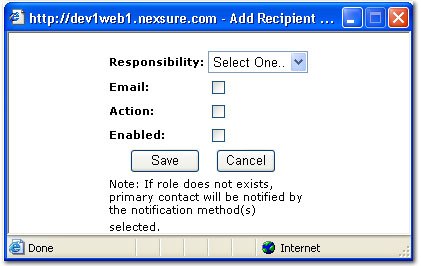
- In the Responsibility list, select the role of the staff member to be notified. Selections in this list are based on the roles of the staff members assigned to the account.
- Select the Email check box to allow the staff member to receive email notifications of the attachment activity.
- Select the Action check box to allow the staff member to receive a new Nexsure action each time there is attachment activity.
- Select the Enabled check box to activate the notifications for the responsibility selection.
- Click Save to save the selections. The selection is added to the Other Assignments area of the Attachments screen.
Or
Click Cancel to exit the Add Recipient dialog box without saving selections.

- In the Setup Console, click Announcements. The following options are available on the Announcements screen:
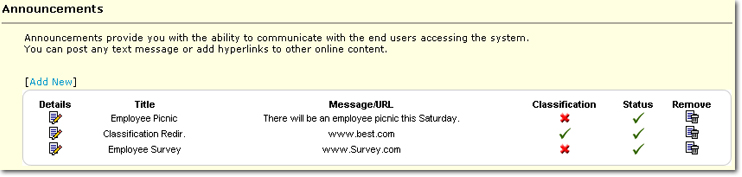
An Announcements area may be added to the portal if the agency chooses to add announcements. If displayed, this area can be used to hold announcements or messages from the agency. The announcement can be a link to an existing Web site or a pop-up message may be displayed giving information from the agency.
- On the Announcements summary screen there are several options:
- Details: Click the Details
 icon to edit an existing announcement.
- Title: The title of the announcement that will be displayed in the portal under the Announcements section.
- Message / URL: Either the message that will be displayed in the pop-up announcement or the URL to which the announcement link in the portal is directed.
- Classification: A
 will be displayed if the announcement is available for agents with specific classifications. An
  is displayed if the announcement is not limited by classifications and is available for all agents. The Classifications are selected when adding a new announcement or editing an existing announcement.
- Status: A will be displayed if the status of the announcement is Enabled for agents. An is displayed if the announcement is not Enabled for clients.
- Remove: The Remove
 icon can be clicked to delete the announcement permanently. If the announcement may be used again at a later time, remove the Enabled selection in the announcement rather than deleting the announcement. If the announcement will never be used again, deleting is a good option.
- On the Announcements screen, click [Add New]. The Add Announcement screen is displayed.
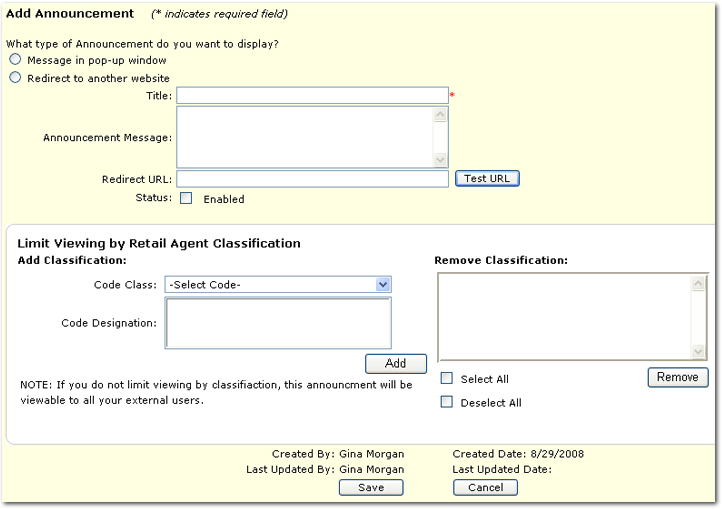
- Select one of the following options to determine what kind of display type will be used for the announcement:
- Message in pop-up window: Use this option to add a custom announcement message that will be displayed in a pop-up window.
- After selecting Message in pop-up window, the following must be completed:
- Title: Enter the title of the message. This title will be displayed on the menu of the retail agent access system under Announcements.
- Announcement Message: Enter the message to be displayed in the pop-up window. There is no limit on the number of characters allowed in this box. A scroll bar will become available when the number of characters exceeds the box size.
- Status: Select Enabled if the announcement is to be displayed on the retail agent access screen. Clear the check box if the announcement is not to be displayed to the agent at this time.
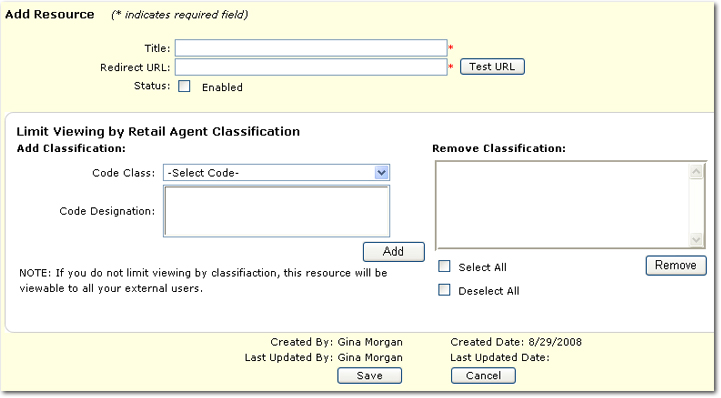
- Redirect to another website: Use this option to add a link to an existing Web site that contains the announcement.
- After selecting Redirect to another website, the following must be completed:
- Title: Enter the title of the message. This title will be displayed on the menu of the retail agent access system under Announcements.
- Redirect URL: Enter the URL to which the client will be connected upon clicking the associated title in the retail agent access system.
- Test URL: Click Test URL to test the link.
- Status: Select Enabled if the announcement is to be displayed on the retail agent access screen. Clear the check box if the announcement is not to be displayed to the retail agent at this time.
- Optionally, in the Add Classification area, classifications can be selected to limit the agents that will see the announcement. If no Classifications are selected, all agents will be able to view the announcement. Code classifications are attached to a agent record in the SEARCH > retail agent details > classifieds tab. See the Retail Agent Classified Tab topic for more information about adding classifications to a retail agent record.
- Code Class: Select a code to view the associated code designations.
- Code Designation: Select one or more code designations by pressing the Ctrl or Shift keys while selecting. Use the CTRL key to make non-adjacent selections. Use the SHIFT key to make adjacent selections.
- Add: Click Add once all code selections have been made in the Code Designation list. The classification is added to the Remove Classification area.
- Remove Classification: The classifications displayed determine the clients that are allowed access to the announcement. Classifications can be selected and removed if necessary by selecting the check box next to the classification.
- Select All: Select this check box to select all classifications in the Remove Classification list.
- Deselect All: Select this check box to clear all selections in the Remove Classification list.
- Remove: Once all classification selections have been made in the Remove Classification list, click Remove. The classifications are removed from the list.
- After all selections have been made on the Add Announcement screen, click Save. The new announcement is saved and is displayed on the Announcements screen. Announcements can be removed by clicking the Remove icon or the announcement can be disabled by clicking the Details icon and removing the Status > Enabled selection. Disabling an announcement is recommended vs. removing if the announcement will be used again at a later date.
Or
Click Cancel to exit the screen without saving any selections.
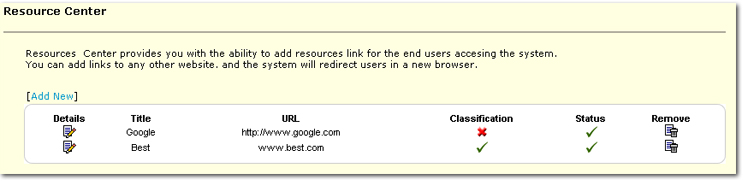
- In the Setup Console, click Resource Center. The following options are available on the Resource Center screen:
Client Access General Configuration
Client Access Color Schemes